
Unlock the Secrets of Captivating 360-Degree Time-Lapse with Your GoPro!
Time-lapse photography has transformed the way we capture the world around us. This technique, which involves taking a series of photographs at set intervals and compiling them into a video, allows us to see the passage of time in a mesmerizing way. With the increasing popularity of this art form, many photographers and videographers are turning to compact and versatile cameras for their projects. Among these, the GoPro stands out as an ideal choice due to its durability, high-quality image capture, and remarkable adaptability. When paired with a 360-degree rotating mount, the GoPro becomes a powerful tool for creating dynamic and immersive time-lapse videos that bring scenes to life from all angles. In this article, we will delve into the intricacies of time-lapse photography and explore how to leverage a GoPro time-lapse rotating mount for stunning results.
Understanding Time-Lapse Photography
At its core, time-lapse photography is about capturing moments over a period of time and presenting them in a condensed format. This technique is achieved by taking a series of photographs at specified intervals—seconds, minutes, or even hours apart—which are then played back in quick succession. The result is a captivating video that showcases the transformation of a scene, whether it’s the blooming of flowers, the hustle and bustle of a city, or the movement of clouds across the sky. The beauty of time-lapse lies in its ability to reveal patterns and changes that our eyes might overlook in real time. By utilizing a GoPro camera, which allows for precise control over interval settings and image quality, creators can capture stunning time-lapse videos that engage and inspire audiences.
Benefits of Using a GoPro for Time-Lapse
GoPro cameras are renowned for their exceptional capabilities, making them a top choice for time-lapse photography. One of the most significant advantages is their compact size, which enables easy portability and mounting in various locations. This is particularly useful for adventurous photographers who want to capture time-lapse sequences in challenging environments, whether on a mountain hike or underwater. Additionally, GoPros are designed to withstand tough conditions, ensuring that they can perform reliably in adverse weather. The high-quality image capture capabilities of GoPro cameras also enhance the final output, providing sharp and vibrant visuals that elevate the viewer's experience. With user-friendly settings that allow for easy adjustments to intervals and exposures, GoPro cameras empower photographers to focus on their creative vision without getting bogged down by complicated tech.
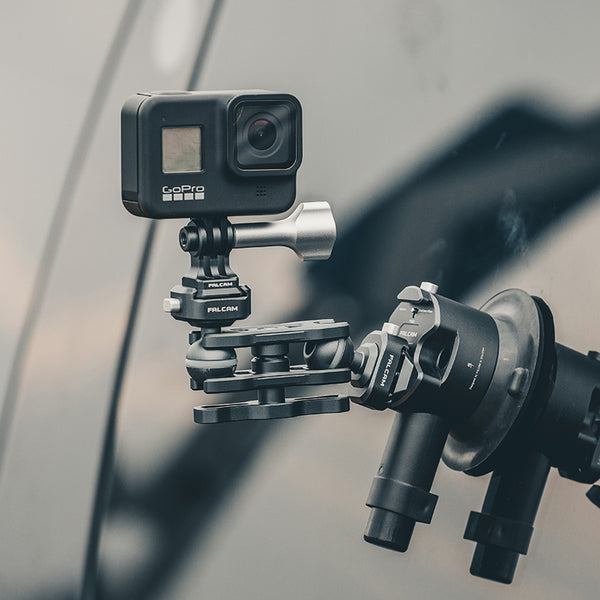
Introducing the 360-Degree Rotating Mount
A 360-degree rotating mount is a game-changer for time-lapse photography, enabling dynamic movement that adds depth to your videos. Unlike traditional static mounts, a rotating mount allows the camera to capture a full panoramic view, providing an immersive experience for viewers. This technology works by gradually rotating the camera at set intervals, which can be synchronized with the time-lapse shooting. The result is a visually stunning video that not only shows the passage of time but also showcases the environment from multiple angles. Imagine capturing the sunrise over a landscape while simultaneously revealing the surrounding scenery—a rotating mount makes this possible. This innovative tool opens up a realm of creative possibilities, allowing photographers to experiment with perspectives and movements that were previously difficult to achieve.
How to Set Up Your GoPro with a Rotating Mount
Setting up your GoPro with a 360-degree rotating mount is straightforward. First, ensure you have a compatible rotating mount designed for your GoPro model. Begin by securing the camera onto the mount, making sure it is fastened tightly to avoid any shaking during filming. Next, choose a location that offers a captivating view, ensuring there are interesting elements in the foreground and background. Adjust the angle of the camera to capture the desired composition. Once positioned, it’s time to configure the camera settings. Select the time-lapse mode and adjust the interval settings according to the length of time you wish to capture. For instance, a shorter interval works well for fast-moving subjects, while longer intervals are suitable for slower scenes. Start the recording and let the magic happen! Remember to check the battery life and storage space before beginning, as time-lapse sessions can consume both quickly.
Tips for Capturing Stunning 360-Degree Time-Lapses
To achieve breathtaking 360-degree time-lapses, consider several factors that can significantly impact your results. First and foremost, lighting is key—shoot during the golden hours (early morning or late afternoon) for softer, more flattering light. Choosing the right location is equally important; look for scenes with interesting elements that will enhance the visual narrative of your time-lapse. Additionally, patience is crucial. Allow ample time for the camera to capture the entire sequence, as rushing may compromise the quality of your footage. Once you have your time-lapse recorded, post-processing can elevate your final product. Use editing software to adjust colors, enhance clarity, and add subtle effects that will captivate viewers. A well-edited time-lapse can turn a simple sequence into a mesmerizing visual story.
Capturing Time in 360-Degrees with GoPro
In summary, the combination of a GoPro camera and a 360-degree rotating mount offers an exciting opportunity to explore the world of time-lapse photography. This powerful duo allows photographers to capture breathtaking scenes in a dynamic and innovative way, revealing the beauty of time as it unfolds. By understanding the fundamentals of time-lapse, harnessing the unique advantages of GoPro, and mastering the art of using a rotating mount, you can create captivating videos that tell compelling stories. Don't hesitate to experiment with different settings, locations, and techniques—your creativity is the only limit. So grab your GoPro, set up your rotating mount, and start capturing the world in a whole new light!