Unlock the Secrets to Stunning Low-Light Shots with the Perfect Tripod!
Low-light photography presents a unique set of challenges for photographers, whether you're capturing a vibrant cityscape at dusk or the serene beauty of a starry night. In these dimly lit environments, achieving clarity and detail can feel like an uphill battle. This is where a tripod becomes an indispensable tool in your photography arsenal. By providing stability and support, a tripod allows you to experiment with longer exposure times, ensuring that your images remain sharp and free from motion blur. In this article, we will explore how the right tripod can significantly enhance your low-light photography performance, offering insights and tips to help you make the most of your nighttime shooting adventures.
Understanding Low-Light Photography
Low-light photography is a genre defined by its conditions—often capturing scenes with minimal available light. Common scenarios include twilight landscapes, indoor events, and astrophotography. In these settings, the camera's sensor struggles to gather enough light, resulting in images that can appear grainy or lack detail. The technical aspects of low-light conditions involve understanding the relationship between shutter speed, aperture, and ISO. A slower shutter speed allows more light to hit the sensor, but it also increases the likelihood of blur from camera shake. Higher ISO settings can amplify light sensitivity but often introduce noise. Mastering these elements is essential for creating compelling images in low-light environments.
The Role of a Tripod in Low-Light Photography
Stability is paramount in low-light photography, and this is where a tripod shines. By securing your camera in place, a tripod enables longer exposure times without the risk of motion blur, which is particularly crucial when photographing at slow shutter speeds. A friend of mine, an avid nighttime photographer, shared how a sturdy tripod transformed his approach to capturing the night sky. He could finally take 30-second exposures without worrying about the camera shaking, allowing him to capture stunning star trails that he had previously thought impossible. The benefits of using a tripod extend beyond just eliminating blur; it also frees you to experiment with creative compositions and allows for precise framing, which is often harder to achieve when shooting handheld.
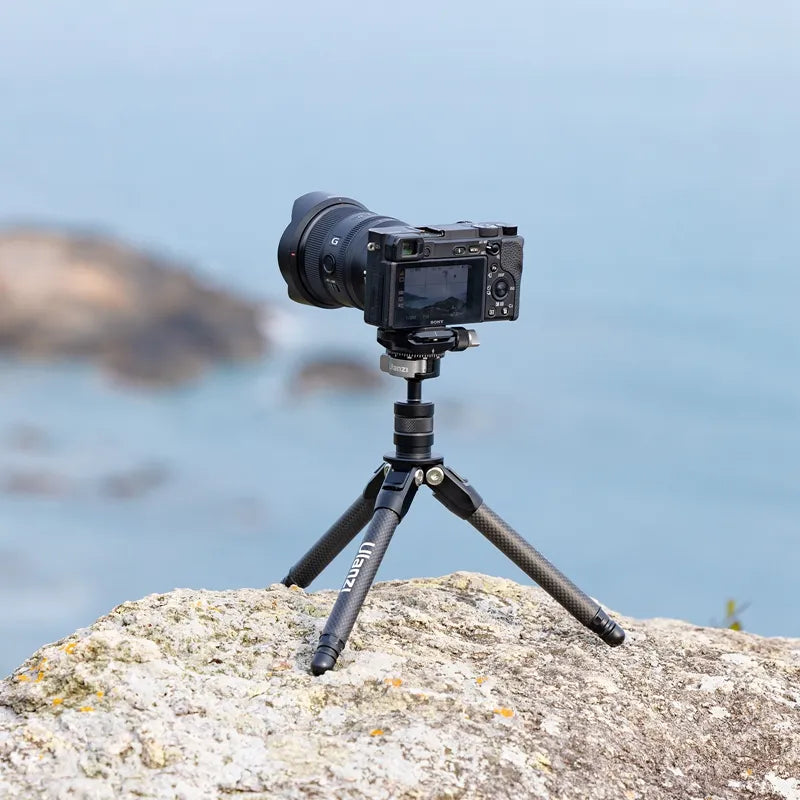
Choosing the Right Tripod for Low-Light Photography
When selecting a tripod for low-light photography, there are several key features to consider. Height is important; a tripod that can extend high enough allows you to shoot from various angles without crouching or bending. Weight is another crucial factor; while heavier tripods tend to offer more stability, they can be cumbersome to carry on location. Material also plays a role—aluminum tripods are sturdy but heavier, while carbon fiber options are lightweight and resistant to vibrations but often come at a higher cost. Stability is perhaps the most critical aspect; a tripod with a wide base and effective locking mechanisms will provide the steadiness necessary for crisp images in challenging lighting conditions. Understanding these features will help you make an informed choice tailored to your shooting style and preferences.
Techniques for Using a Tripod in Low-Light Conditions
Setting up a tripod effectively in low-light scenarios can greatly enhance your shooting experience. Start by ensuring that your tripod is on a stable surface and that all legs are locked securely. A common technique is to use a remote shutter release or the camera's built-in timer to minimize camera shake when taking a shot. Additionally, consider adjusting your camera settings for optimal results; using a low ISO setting can reduce noise, while a wide aperture can help gather more light. My friend often uses a flashlight to help him position his tripod and frame his shots in the dark, which has made a world of difference in his low-light photography. Experiment with different angles and compositions, and don’t hesitate to take multiple shots to ensure you capture the perfect moment.
Common Mistakes to Avoid with Tripods in Low-Light Photography
Even with a tripod, photographers can make mistakes that hinder their low-light photography efforts. One common error is not properly setting up the tripod, such as failing to ensure all legs are locked or placing it on an unstable surface. This can lead to unwanted blur, negating the benefits of using a tripod. Another frequent mistake is using an inappropriate shutter speed that is still too slow, resulting in camera shake. It’s essential to find the right balance between exposure time and stability. Additionally, overlooking composition can lead to missed opportunities; take time to frame your shots thoughtfully, as low-light settings can create unique and dramatic scenes. By avoiding these pitfalls, you can significantly improve your low-light photography results.
Maximizing Your Low-Light Photography Experience
In summary, the right tripod can be a game-changer for enhancing your low-light photography. By understanding the challenges posed by low-light conditions and the importance of stability, you can choose a tripod that meets your specific needs. From selecting the right height, weight, and material to employing effective shooting techniques, every detail contributes to capturing stunning nighttime images. Don’t hesitate to experiment with your gear, as each outing can provide valuable lessons and improve your skills. Embrace the beauty of low-light photography and unlock your creative potential with the perfect tripod by your side.